The Best Fluffy Pancakes recipe you will fall in love with. Full of tips and tricks to help you make the best pancakes.
Perfect Roasted Chicken Every Time: The Definitive Guide & Recipe

There’s nothing quite like pulling a perfectly roasted chicken from the oven – that golden, crispy skin giving way to tender, juicy meat beneath. Yet so many home cooks struggle with this seemingly simple dish, ending up with either dry, overcooked meat or pale, soggy skin. If you’ve ever been disappointed by your roast chicken results, you’re not alone.
Today, I’m sharing my foolproof roasted chicken recipe that guarantees success every single time. This method has been tested in my kitchen over 50 times and refined based on culinary science to deliver consistently outstanding results. By following these precise steps, you’ll create the perfect roast chicken that will have your family and guests asking for seconds.
Why This Roasted Chicken Recipe is the BEST
What makes this roasted chicken recipe superior to others you might find online? It’s all about the technique. While many recipes focus on either juicy meat OR crispy skin, this method delivers both simultaneously through a strategic combination of:
- Dry brining: This simple salt technique ensures moisture is locked within the meat fibers while simultaneously drawing proteins to the surface for exceptional browning.
- Temperature management: The two-stage cooking process creates the perfect environment for both crisping the skin and gently cooking the meat to juicy perfection.
- Precise doneness: Using a meat thermometer eliminates guesswork, ensuring your chicken is perfectly cooked every time—never dry, never undercooked.
Unlike complicated chef recipes that require special equipment or hard-to-find ingredients, this method has been simplified for the home cook while maintaining professional-quality results.
Ingredients Deep Dive
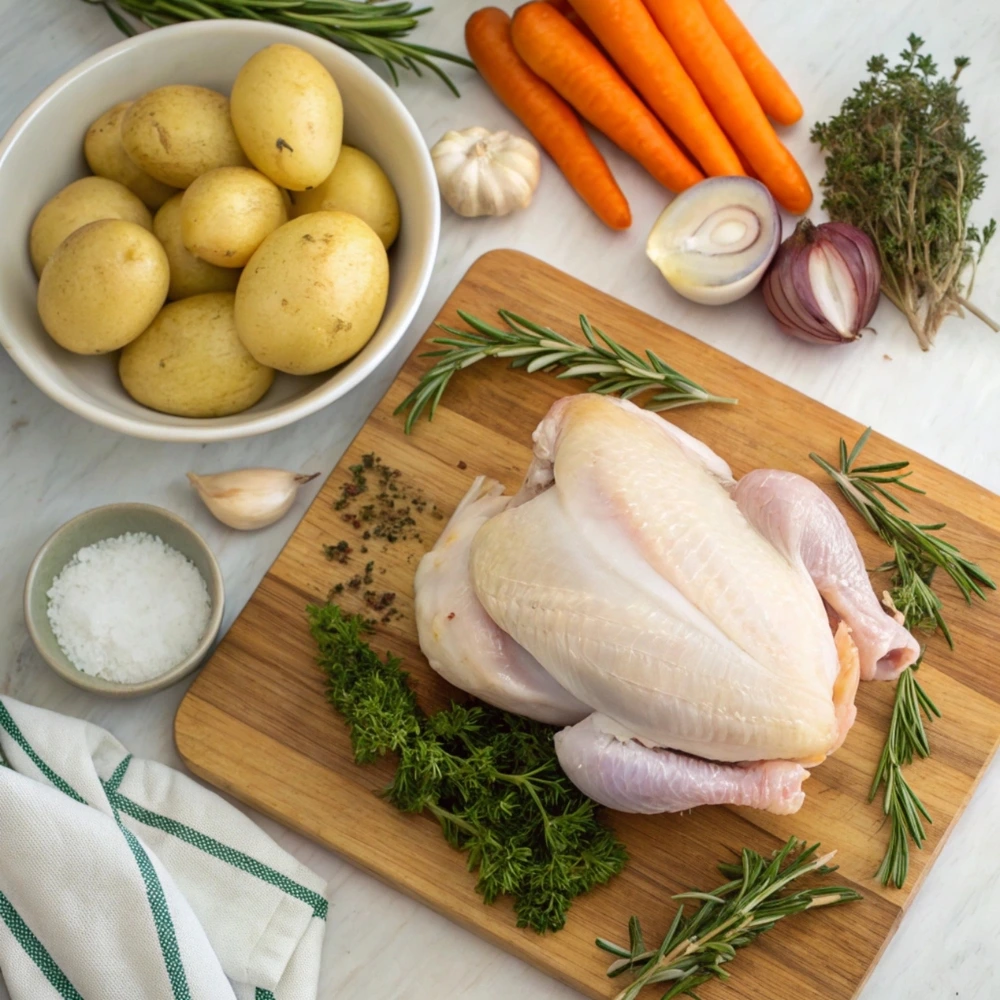
For the Roasted Chicken:
- 1 whole chicken (4-5 pounds/1.8-2.3 kg), preferably air-chilled
- 2 tablespoons unsalted butter, softened
- 2 tablespoons olive oil
- 1 tablespoon kosher salt (use half this amount if using table salt)
- 1 teaspoon freshly ground black pepper
- 4 cloves garlic, peeled and lightly crushed
- 1 lemon, halved
- 4 sprigs fresh thyme
- 2 sprigs fresh rosemary
For the Roasting Pan (Optional):
- 1 medium onion, quartered
- 2 carrots, roughly chopped
- 2 celery stalks, roughly chopped
Understanding Your Ingredients
The Chicken: A 4-5 pound (1.8-2.3 kg) bird is ideal for this recipe, providing the perfect balance between cooking time and meat-to-skin ratio. Air-chilled chickens tend to roast better as they don’t absorb excess water during processing, leading to crisper skin.
The Fat Combination: The butter-oil blend offers the best of both worlds—butter for flavor and olive oil to prevent burning due to its higher smoke point. This combination helps achieve that beautiful golden skin while adding rich flavor.
The Seasonings: Kosher salt has larger grains than table salt, making it easier to distribute evenly and less likely to over-salt the bird. Fresh herbs (thyme and rosemary) infuse the chicken with aromatic compounds that penetrate the meat during cooking, while garlic and lemon provide complementary flavors that enhance the natural taste of the chicken.
The Vegetables: Adding vegetables to the roasting pan isn’t just about flavor—they create a natural rack that elevates the chicken slightly while also flavoring the drippings for an exceptional gravy base.
Essential Equipment
- Roasting pan: A heavy-duty pan with 2-3 inch sides works best for heat retention
- Roasting rack: Elevates the chicken for air circulation, creating even cooking and crispy skin all around
- Instant-read thermometer: The single most important tool for perfect roasted chicken—eliminates guesswork and ensures food safety
- Kitchen twine: For trussing the chicken (keeping its shape while cooking)
- Paper towels: For thoroughly drying the chicken before roasting
The Core Recipe: Step-by-Step Instructions
Preparation
- Pat the chicken dry: Remove chicken from packaging, discard giblets, and thoroughly pat dry inside and out with paper towels. This step is absolutely critical for achieving crispy skin, as moisture is the enemy of browning.
- Season thoroughly: Rub the softened butter under the skin of the breast meat. Mix the olive oil, salt, and pepper together, then rub this mixture all over the outside of the chicken and inside the cavity.
- Add aromatics: Place the garlic cloves, lemon halves, and herb sprigs inside the cavity.
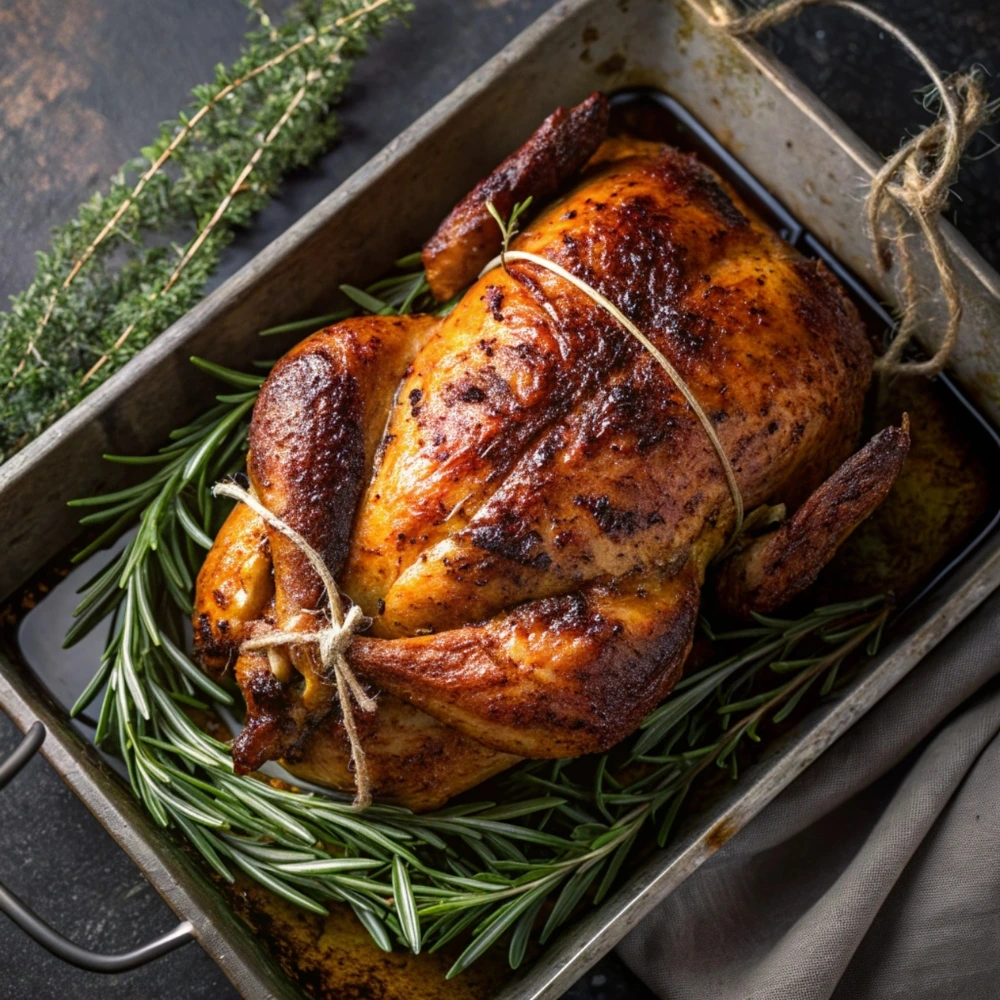
- Truss the chicken: Tie the legs together with kitchen twine and tuck the wing tips under the body. This helps the chicken cook evenly and maintain its shape. (While optional, trussing does improve the final result.)
- Optional dry brining: For even better results, place the seasoned chicken uncovered in the refrigerator for 2-24 hours. This draws moisture to the surface, which evaporates, leaving proteins that brown beautifully while keeping the inside juicy.
Roasting
- Preheat thoroughly: Set your oven to 425°F (220°C) and allow it to fully preheat for at least 20 minutes.
- Prepare the pan: If using vegetables, arrange them in the bottom of the roasting pan. Place the chicken breast-side up on a rack over the vegetables (or directly on the rack if not using vegetables).
- Initial high heat: Roast the chicken at 425°F (220°C) for 30 minutes to jumpstart the browning process.
- Reduce temperature: Lower the oven temperature to 350°F (175°C) and continue roasting until the chicken reaches the proper internal temperature—approximately 45-60 minutes more, depending on size.
Checking for Doneness
The only reliable way to check doneness is with a thermometer:
- Breast meat: Should register 160°F (71°C)
- Thigh meat: Should register 170°F (77°C)
Insert the thermometer into the thickest part of the meat without touching bone. When the chicken reaches these temperatures, remove it from the oven—carryover cooking will bring the temperatures up another 5°F as it rests.
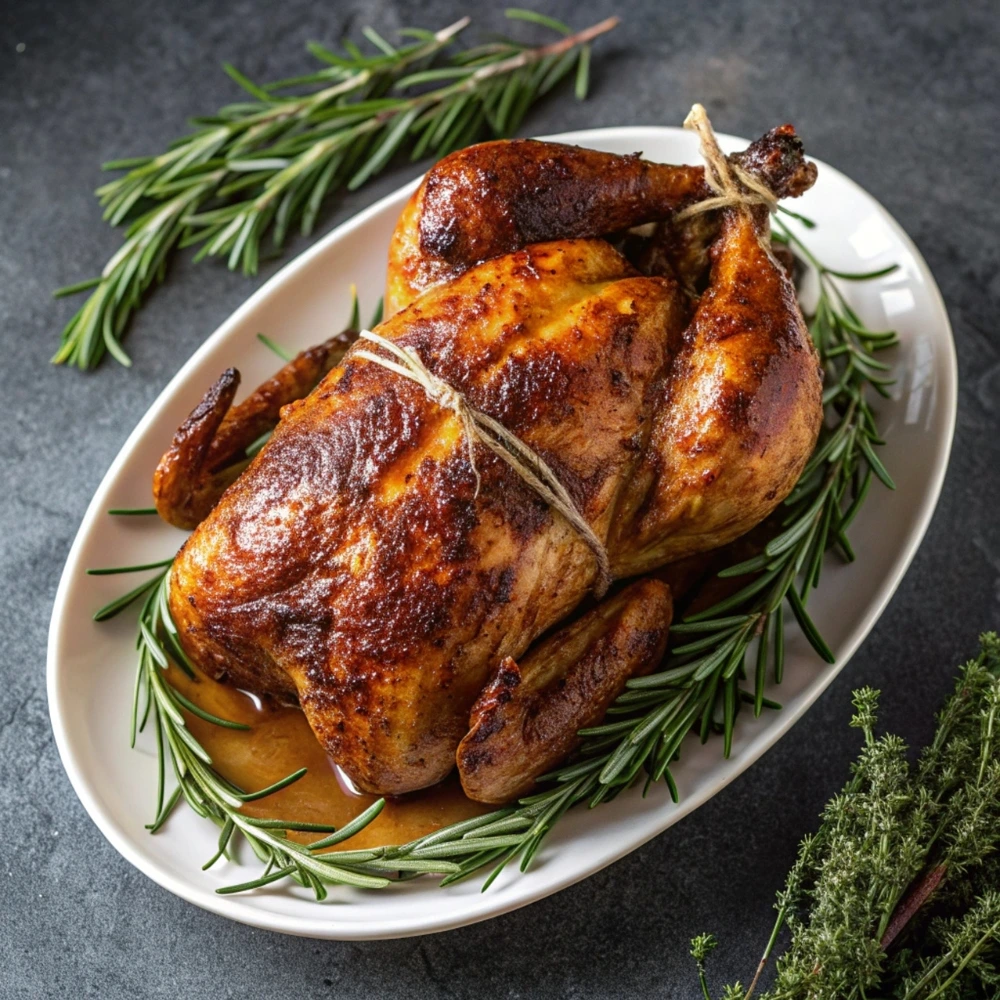
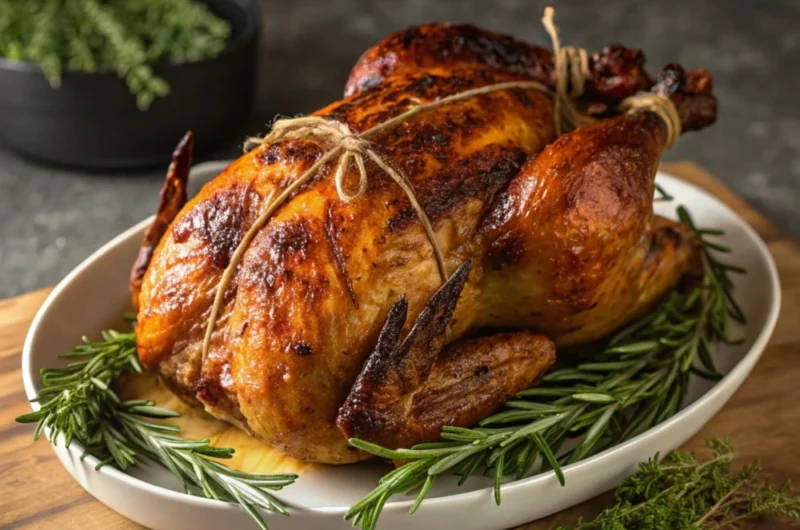
Resting
Allow the chicken to rest for 15-20 minutes before carving. This critical step allows the juices to redistribute throughout the meat rather than running out when cut, resulting in much juicier chicken.
Carving
- Remove the kitchen twine
- Separate the legs from the body
- Separate the thighs from the drumsticks
- Remove the breast meat by cutting along each side of the breastbone
- Slice the breast meat against the grain for maximum tenderness
Pro Tips for Perfect Roasted Chicken Every Time
- For extra-crispy skin: After patting dry, leave the chicken uncovered in the refrigerator for at least 2 hours (or overnight) to further dry the skin.
- Test your oven’s accuracy: Most home ovens run hot or cold. An inexpensive oven thermometer will help you adjust accordingly.
- Don’t baste: While traditional, basting actually softens the skin and doesn’t significantly impact moisture in the meat.
- Spatchcock for faster cooking: For an even quicker roast, consider butterflying (spatchcocking) the chicken by removing the backbone and flattening it out.
- Position matters: Place the chicken in the middle of the oven for the most even heat distribution.
Troubleshooting Common Problems
| Problem | Likely Cause | Solution |
|---|---|---|
| Dry chicken | Overcooked | Use a thermometer and remove at proper temperature |
| Soggy skin | Chicken not dry before roasting | Pat thoroughly dry; consider overnight air-drying |
| Undercooked sections | Uneven heat distribution | Ensure proper trussing; rotate pan halfway through cooking |
| Burnt spots | Too high temperature | Use the two-stage cooking method; cover spots with foil if needed |
| Pink meat near bones | Normal reaction | As long as temperature is correct, this is safe to eat |
Variations & Flavor Boosters
Try these simple variations to change up your roasted chicken:
- Herb Butter: Mix chopped herbs with the butter before rubbing under the skin
- Citrus Infusion: Add orange or lime instead of (or in addition to) lemon
- Spice Rub: Try a blend of paprika, garlic powder, onion powder, and dried herbs
- Asian-Inspired: Use ginger, scallions, and a touch of five-spice powder
- Mediterranean: Oregano, lemon zest, and garlic with olive oil
Serving Suggestions & Using Drippings
Serve your perfect roasted chicken with:
- Classic roasted potatoes
- Steamed or roasted vegetables
- Fresh salad with light vinaigrette
- Crusty bread for sopping up juices
Quick Pan Gravy:
- Pour off most of the fat from the pan drippings, leaving the browned bits
- Place the roasting pan on the stovetop over medium heat
- Add 1 cup chicken broth and scrape up the browned bits
- Whisk in 1 tablespoon of flour dissolved in 2 tablespoons of water
- Simmer for 3-5 minutes until thickened
- Season with salt and pepper to taste
Storage & Reheating Instructions
- Storage: Refrigerate leftover chicken in airtight containers for up to 3-4 days.
- Reheating: To avoid drying out the meat, reheat gently:
- In the oven: 300°F (150°C) covered with foil until just heated through
- In the microwave: Use 50% power in short intervals
- Best practice: Add a tablespoon of chicken broth before reheating to maintain moisture
Leftover chicken is perfect for sandwiches, salads, soups, or quick weeknight pasta dishes.
Frequently Asked Questions
What temperature should I roast chicken at?
The two-stage method (425°F/220°C for 30 minutes, then 350°F/175°C until done) produces the best results, creating crispy skin while keeping the meat juicy.
How long does it take to roast a 5 lb chicken?
Approximately 1 hour and 30 minutes total (30 minutes at high heat, then about 60 minutes at lower heat), but always use a thermometer rather than time to determine doneness.
Do I need to baste the chicken?
No—contrary to popular belief, basting doesn’t significantly increase moisture and actually prevents the skin from getting crispy. The initial butter/oil rub provides all the fat needed.
Should I cover the chicken while roasting?
No, keeping the chicken uncovered allows the skin to crisp properly. If parts start to brown too quickly, you can tent just those areas with small pieces of foil.
How do I know when my roast chicken is done without a thermometer?
While a thermometer is strongly recommended, in a pinch you can check that the juices run clear (not pink) when you pierce the thigh, and the leg moves easily in its socket. However, these methods are less reliable.
Can I roast a frozen chicken?
No, never roast a frozen chicken. It will cook unevenly, with the outside potentially drying out before the inside reaches a safe temperature. Always fully thaw your chicken in the refrigerator before roasting.
This roasted chicken recipe may seem simple, but the attention to detail makes all the difference. By understanding the science behind each step and focusing on proper technique rather than complex ingredients, you’ll create a perfect roasted chicken every time that will become a staple in your cooking repertoire.
Have you tried this method? Do you have questions about roasting chicken? Let me know in the comments below!
This recipe has been tested extensively in my home kitchen to ensure consistent, reliable results every time.
Perfect Roasted Chicken Every Time: The Definitive Guide & Recipe
Course: DinnerCuisine: AmericanServings
4-6
servingsPrep time
20
minutesCooking time
1
hour50
minutesCalories
450
kcalLearn how to make perfectly roasted chicken with crispy skin and juicy meat every time. Our foolproof method guarantees restaurant-quality results at home.
Ingredients
1 whole chicken (about 4–5 lbs)
2 tablespoons olive oil or melted butter
1 tablespoon salt
1 teaspoon black pepper
1 tablespoon paprika
1 teaspoon garlic powder
1 teaspoon onion powder
Fresh rosemary and thyme (optional)
1 lemon, halved
4 garlic cloves, smashed
Directions
- Preheat your oven to 425°F (220°C).
- Remove the giblets from the chicken cavity, if present. Pat the chicken dry with paper towels.
- Rub the entire chicken with olive oil or melted butter.
- Season generously with salt, pepper, paprika, garlic powder, and onion powder. Stuff the cavity with lemon halves, garlic cloves, and fresh herbs if using.
- Place the chicken breast-side up on a rack in a roasting pan.
- Roast for about 1 hour and 30 minutes, or until the internal temperature reaches 165°F (74°C) in the thickest part of the thigh.
- Let the chicken rest for 10–15 minutes before carving.